

A Little History
GraphQL is a query language developed by Facebook in 2015. It was created to be an efficient alternative to the REST API. GraphQL is gaining popularity as more software developers, engineers, and companies consider various procedures to design or consume APIs. GitHub upgraded from using REST services due to its scalability and flexibility drawbacks, and many others. With their API, you can retrieve projects or commit history, etc. Check GitHub’s documentation here.
Guide
I used two weeks to understand GraphQL and its usage. It proved a little hard to learn for a project at the time. In this article, however, I will be detailing a simple step-by-step guide in making a client request using GitHub’s API for any JavaScript beginner out there 😉
Prerequisites
To continue with this guide, you need to have this handy.
- A GitHub account.
- Familiarity with GitHub essentials (repositories, commits, projects, etc.)
- A basic understanding of JavaScript, HTTP Headers, and AJAX
Step 1: Get to know the Explorer
To start, head over to docs.github.com/en/graphql/overview/explorer to begin writing the queries.
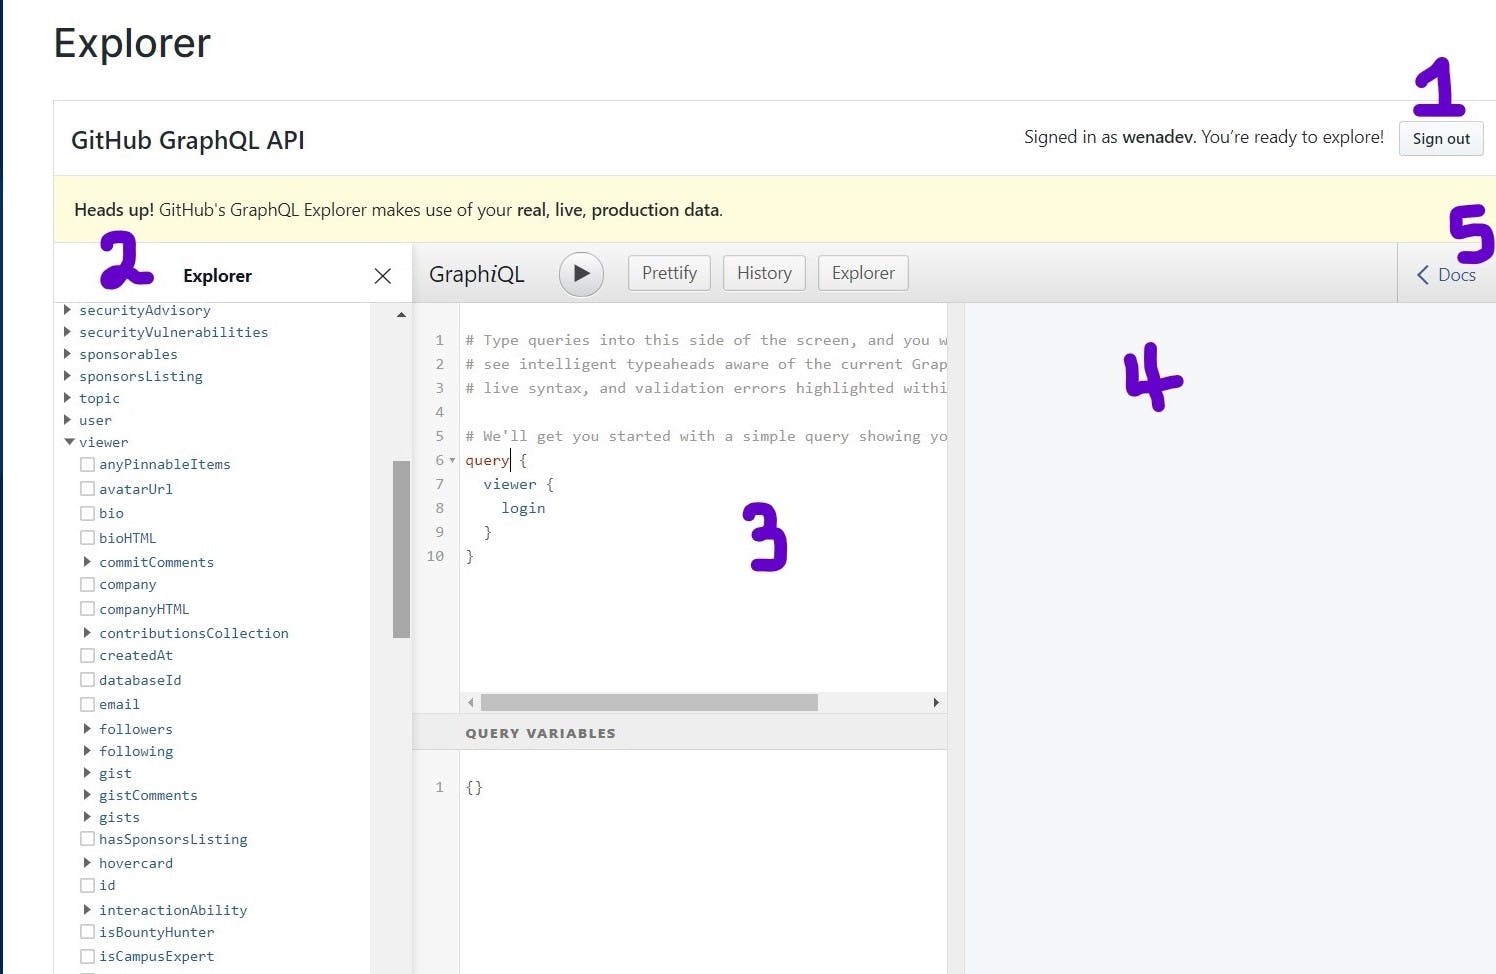
To familiarize yourself with querying the API, I will explain briefly what the numbered sections mean.
- Make sure you’re signed into GitHub. You can only use the API interface when authorized by GitHub.
- The Explorer displays a list of fields holding data. They are ordered in a dropdown that can be selected.
- The GraphiQL interface is a GraphQL IDE where the fields are written and queried.
- The result from (3) above is shown here in an object-like format.
- The collapsible sidebar docs is a detailed description of each type of operation performed. The keywords are from the Explorer in (2) above.
Step 2: Retrieve data from your GitHub account.
Next, select the children fields that will reflect the last committed repository. The query field is used to retrieve data, which in this case, is the repository listed first on your GitHub page.
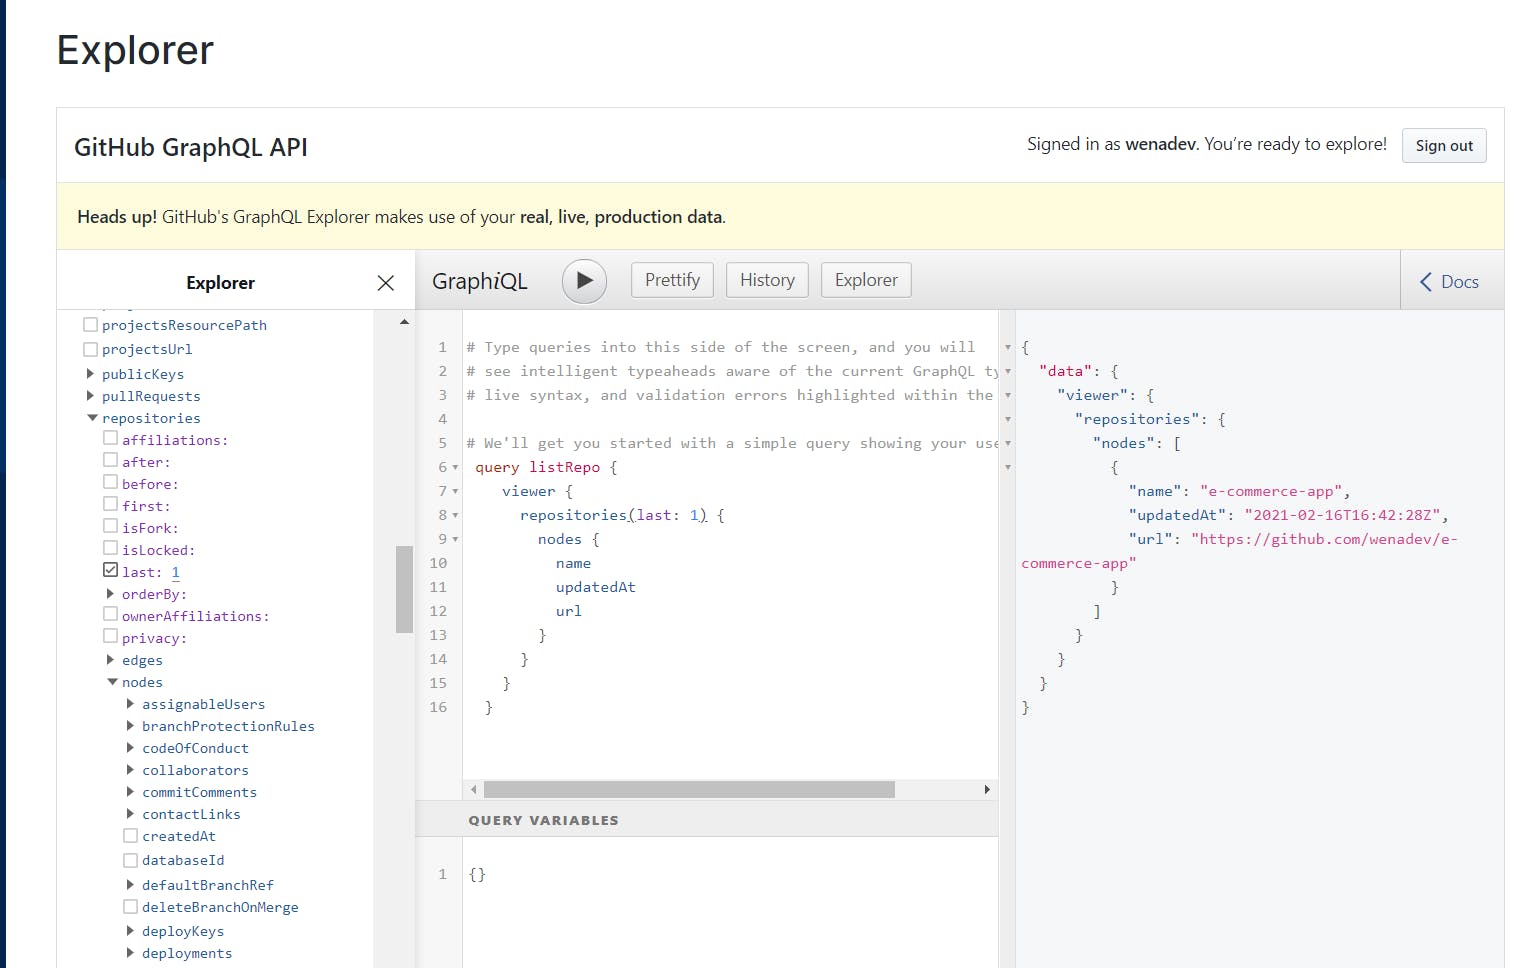
In the Interface, we can see the viewer field encompasses several children. In the sidebar docs description, viewer means the currently authenticated user, which is my logged-in account. This means I can access data associated with my GitHub account using the viewer field. A brief description of what each of the fields is doing:
listRepo- the name of the query, it does not do anythingrepositories- repositories associated with the viewer (my logged-in account)last- returns the last n elements from a listname- retrieves the name of the repository,updatedAt- the last time the repository was updated,url- the URL link of the repository.
This is evident in the section to the right of the GraphiQL Interface. The result of the query shows the name, time, and date of update and the URL of my last committed repository in a neat format. Pretty cool huh? If this confuses you a bit, look in the sidebar documentation to the right of the page. It will show a clear explanation of the fields used to query the API.
Step 3: Get an authentication token from GitHub
Anytime you need to connect to GitHub’s API or command line, you need a personal access token to authenticate. You will need to use this in the HTTP header in the code we will be writing soon. Follow this step-by-step guide from GitHub that shows you how to get one.
Note: Make sure to write it down in a safe place that isn't accessible to anyone else but yourself.
Step 4: Let’s start coding!
const queryVar = ` query listRepo {
    viewer {
      repositories( last: 1) {
        nodes {
          name
          updatedAt
          url
        }
      }
    }
  }  `;

  const urlEndpoint = "https://api.github.com/graphql";
  const header = {
      method: 'POST',
      headers: { 'Authorization': `Bearer ${YOUR_TOKEN_HERE}`},
      body: JSON.stringify({ queryVar })
  };
In this code, we've stored the query we wrote earlier in a variable named queryVar. With GraphQL, one major advantage is we only need one endpoint as a point of entry to receive as much data we need from GitHub's server. In our code, we'll store the endpoint inurlEndpoint We also have to write an HTTP header containing the method, authorization token we got from GitHub, and a method to convert the response from the query into a string. This header is what we will send with our request to the server.
fetch(urlEndpoint, header)
  .then(res=> res.json())
  .then(res => {
      let fetchedData = res.data.viewer.repositories.nodes[0];

     textString = `
      <p>Repo Name: ${fetchedData.name}</p>
      <p>Last Updated at: ${(fetchedData.updatedAt).slice(0,10)}</p>
      <p>Link URL: <a href="${fetchedData.url}">Click Here</a></p>
     `
     document.body.innerHTML = textString;
    })
After sending the fetch request using one endpoint alongside the header options, we convert the response to a JSON object that JavaScript can access and manipulate. We can display the data in the browser by updating the DOM. Please check out this documentation, if you don’t understand how the fetch API works.
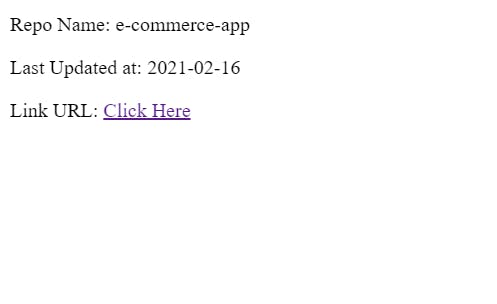
This is what the code above will look like in the browser.
A Final Note
Great!🥳 You know how to use GraphQL. To an extent. There is still so much more to learn about it, and if you are curious, read more articles and books and watch as many tutorials. Check out the clone of my GitHub’s repository page here using the API mentioned in this article.
Leave a comment down below for a suggestion or question. Happy coding!